I have been busy with work and haven’t had as much time for the film scanning project as I would have liked but still, it is alive.
The system starts to be stable enough for real scanning - I have scanned several long reels without any major problems with software or equipment failures. Still, tuning the systems has proved to be quite difficult - as the S8 frame is only 6x4 mm (roughly) even small errors are visible as huge quality problems.
Better Film Holder
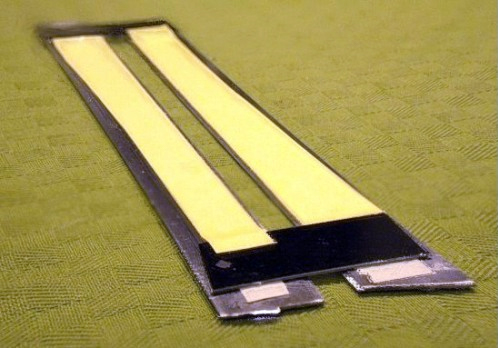
My first film holder was made from two stainless steel rulers that pressed the film against scanner glass from both sides. In practice, the film could bend a little and this showed as the image “wobbling” that repeated every 2 seconds or so. Pretty annoying. I considered several ways to correct this, both using software correction and better hardware. Some others have succeeded in the former by using Hough transform to detect frame edges and then warping the image to correct shape. I choose the hardware route. My new film holder is done from the same rulers I used in the first one, but now they are between scanner glass and film. I used my Dremel tool to make a small stair (about 0.5 mm wide and deep) to one side of both of those. Then I glued a plastic board on top of them, so that the stair holds the film at a suitable distance from scanner and the plastic keeps it flat.

(Yes, I know, not the best picture I have taken but it shows the basic structure)

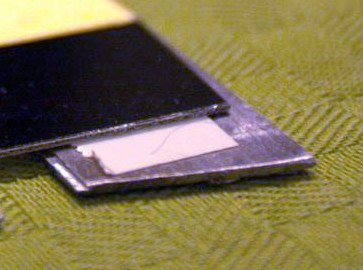
Here is a detail about the edge that holds the film:
The new holder has been quite succesfull. The film stays now flat and the distance from scanner lens is just right so I get significantly sharper scans as well.
Frame Detection
This has been the another major challenge. At first, I thought it should be easy
- after all, the perforations are the brightest spots in the scanned image. However, in practice the films have many weird anomalities and with even 0.1 % error rate we get several bumps every minute.
Here are some examples of problem cases (Both are raw CCD data from scanner, so there are no more details available)

As you can see, one perforation is not visible at all because the emulsion has been damaged when cutting the film. And after that, there is very bright sky and dark silhoutette of a building that easily fool edge detection algorithms.

The example above shows another case where the perforation edge is not visible due to bright sky. So the challenge is how to detect frames with very high accuracy (error of couple of pixels is already very visible) and avoid misinterpreting special cases (like damaged perforation or features looking like perforation edge in the image) I have spent quite much time improving the perforation detection and I start to be close to correct one. There are still some special cases that cause problems - I’ll write a separate post when I get those solved.
Dust Removal
Dust and scratches are currently my biggest image quality problem. Getting the film as clean as possible before scanning is of course the easiest and best solution (the film moves through soft cleaning cloth in my current setup) but it is not perfect.
Currently I use the infrared cleaning feature of VueScan but I am not completely happy with it. Most of my films are shot on Kodachrome stock, and its dyes absorb infrared light more than other film stocks. Vuescan does usually decent job in detecting dust but in the case of Kodachrome it also classifies sharp edges of dark objects on light background as dust. Another thing is of course that I would like to get rid of Vuescan in my workflow (it is GUI software not intended for this use, not well scriptable and and a problem for releasing the project) I have considered implementing infrared channel support to Sane Epson back end but the documentation needed for this seems not to be accessible without NDA…
So - the project is alive and well. The main things in “productizing” the software are now those I mentioned above - perforation detection and Vuescan dependency - I am considering to release the SW as open source project after solving those.