As a teenager in the 80s I was actively shooting films with my Super8 camera.
Most of the stuff was just documentary about my family and friends but I had also more ambitious projects. As so many other in that age I even dreamed of a career as professional film maker before choosing the easy way of playing for my strengths in physics and IT.
That was 20 years ago and I don’t any more have a working film projector. I did transfer the films to VHS tape a long time ago but the quality was quite poor (and no, I don’t have a VHS recorder either). So I have been looking for a way to could digitize the films with a better quality and into format that would stand time.
I have used an Epson 4990 scanner for digitizing my photo archive. It is a very high quality flatbed scanner that can scan 4 strips of 35 mm at once. The obvious question was that could I use it to scan my Super8 films as well?
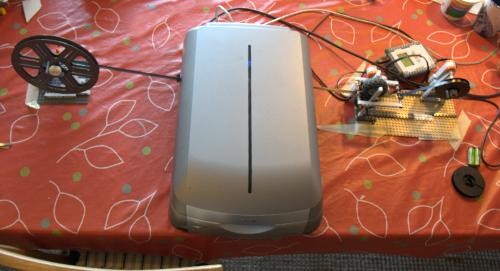
The basic idea was simple: the scanner lid is wide enough to fit about 2 seconds of 8mm film at a time. If I could scan these, somehow extract the individual frames from the scanned image and move the next 2 sec of the film to the scanner… Should be easy, but this must be automated (I don’t want to sit next to my scanner and transfer the film 30 times to get one minute of material…)

My sons love playing with LEGOs and the the Mindstorms robotic kit seemed just the perfect solution for building a prototype of my telecine concept. So we made a deal: they build the film transport system from LEGOs and I take care of the other parts, mainly the control and image processing software needed.
The Transport System
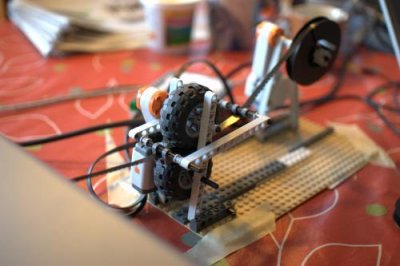
The LEGO part has two main functions: it must pull the film from scanner so that the next unscanned piece of film gets ready, and it must rotate the film reel into which the scanned film goes. We used 2 Mindstorms servo motors, one for each task.

The film is pressed between 2 soft Lego wheels that are rotated by one of the motors. We placed some guides on both sides to the wheels to ensure that the film moves straight (luckily, some Lego parts have exactly 8mm holes in them!)
The film reel is rotated with the other servo. We reused the film guides to detect when the film is tightened and the reel must be stopped.
The most difficult part was to figure out how to keep the film flat in the scanner. Because the frames are only 4x6 mm, even a small bend or twist causes visible warping in the scanned image. We tried many alternatives (ranging from innovative Lego creations to correcting the warp in software), but finally we built a film guide from 2 stainless steel rulers that press the film from both sides against the scanner glass. The system is not perfect but good enough: There is still some jitter caused by bending film but that is tolerable.
The Software
So, the boys did their part and it was time for me to keep my promise! The Mindstorms central unit has a Bluetooth chip and Lego folks have done excellent job in documenting their system so controlling it from PC was easy. Controlling the scanning was another matter.
I ended up using VueScan (by Ed Hamrick) as a scanning software. Despite its, well, not so intuitive UI it can produce better image quality than any other scanning software I have tried. And as far as I know it is the only scanning software in Linux that supports infra-red cleaning. The problem: it is a GUI application and does not have any scripting support. So it required a relatively large amount of hacking to integrate it to other system (hint to Ed: I would love a command line version of VueScan!!!)
I scan 32 frames of film at once and save it as a single image. After that I use custom software to detect the perforations in the scanned image (they are the brightest areas in the scan, so this is relatively easy) and extract individual frames to separate files. Then I use the video encoder of my choice to create suitable video file.
The Results
The resulting video is of surprising high quality, considering that I haven’t spent a lot of time for tuning the image processing part:
Things to Do
Of course, the current system is a prototype. The things I would like to do include:
Image enhancement. I haven’t spent a lot of time in fine-tuning the image quality. The thing that disturbs me most is chromatic aberration. The small frame size exaggerates it and apparently the lenses in cheap S8 cameras were not really top quality. This shows up as colored edges around people and objects.
Correcting chromatic aberration is quite easy but integrating it to my processing pipeline needs still some work. Also, sometimes there is effect that looks like CA even in the centre of the image. I wonder if the viewfinder prism could cause this (In S8 cameras, part of the light coming through lens was reflected to viewfinder by a prism. There was no mirror mechanism as in SLRs and more expensive 16 and 35 mm film cameras)
Speed. Now it takes about 2 minutes to scan 2 seconds of film (with 4800 dpi resolution and infrared cleaning). This is quite OK for me as I can leave the system running overnight but of course it could be faster.
Integration. Now the system has been glued together from LEGOs, other off-the-shelf hardware, Python scripts, GUI testing toolkit (for controlling VueScan), commercial software, custom Java code and (literally) duck tape. It works but it isn’t pretty. It would be much nicer to use (especially for others) if some of the components would be removed and the whole thing packaged into a single program. Sound. Well, for now I have enough mute films to play with but digitizing sound needs some further thinking…
All in all, this was a fun project, full of interesting challenges for kids and dad alike. And even if you can learn a lot by just just playing with LEGOs is it is still better to see how that differs from engineering a working system.